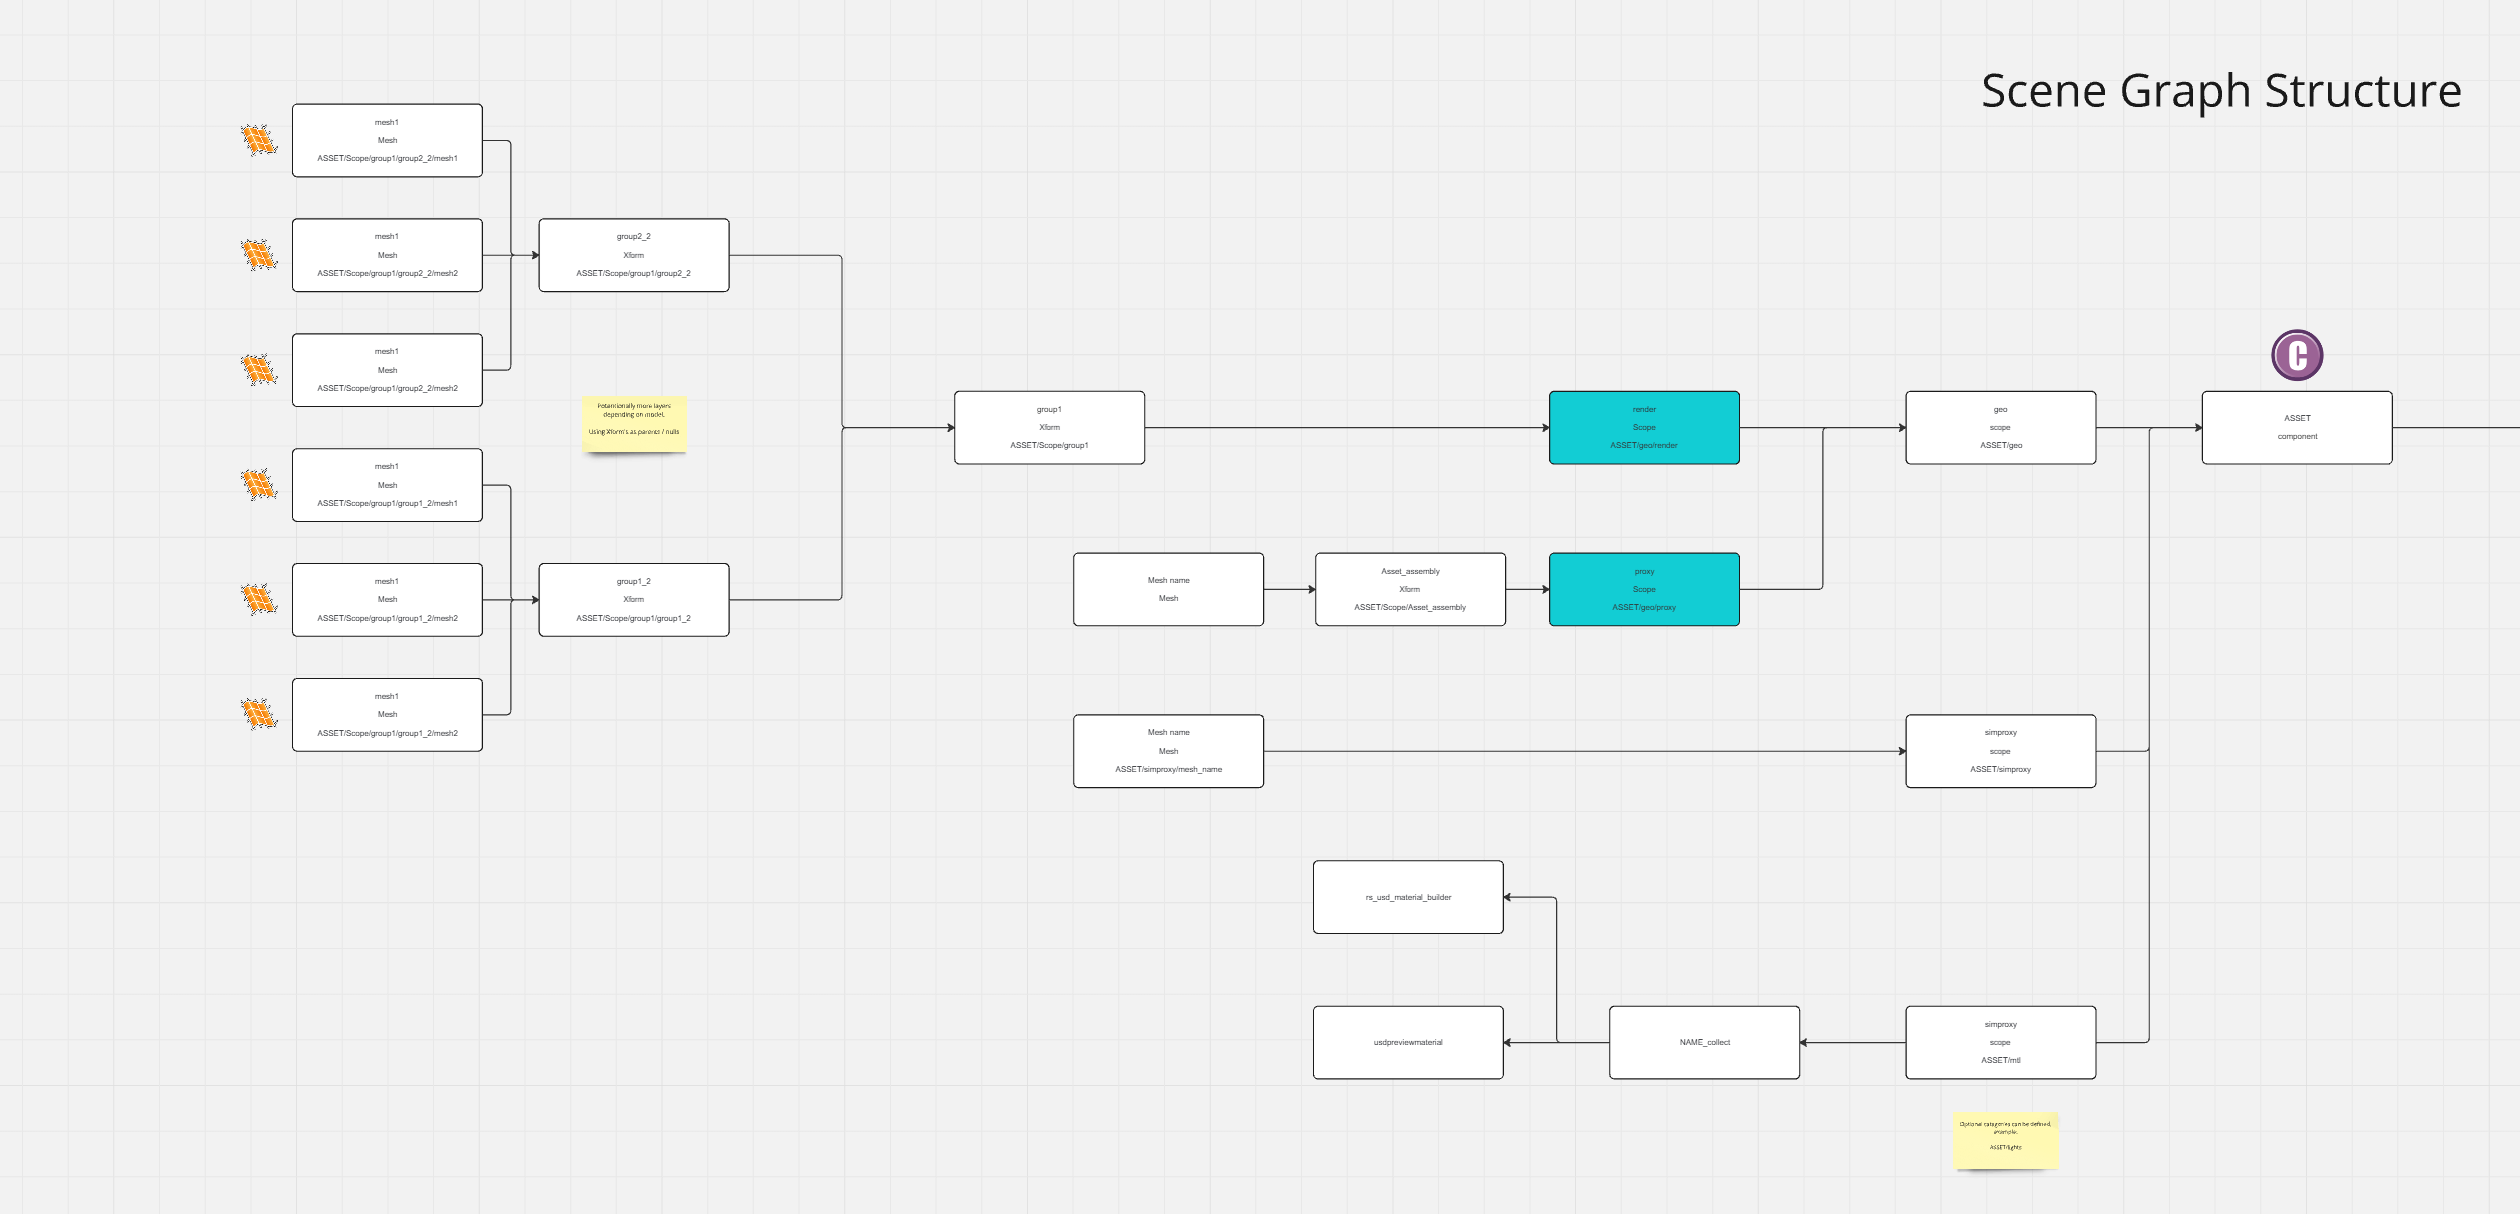
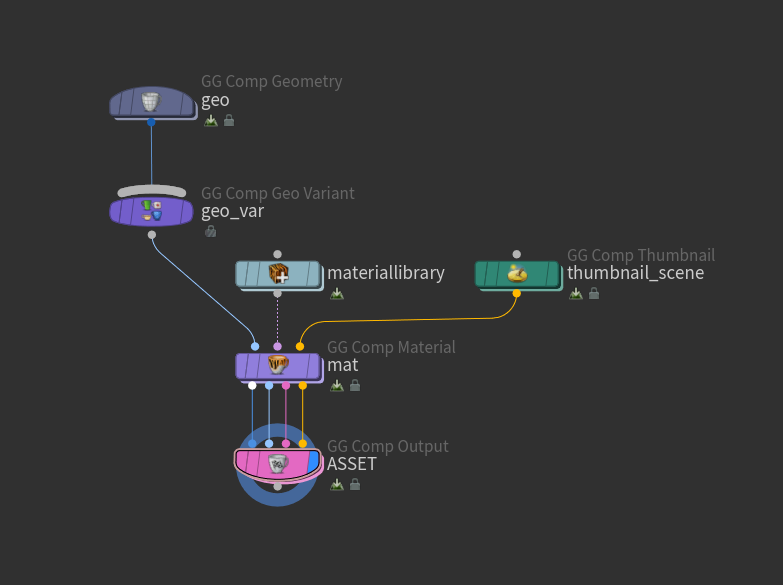
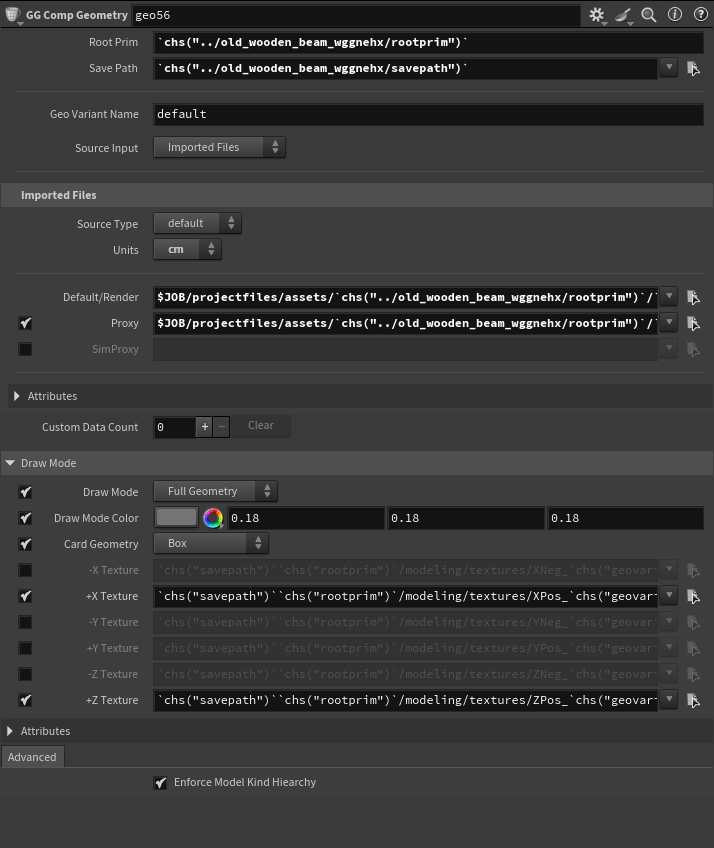
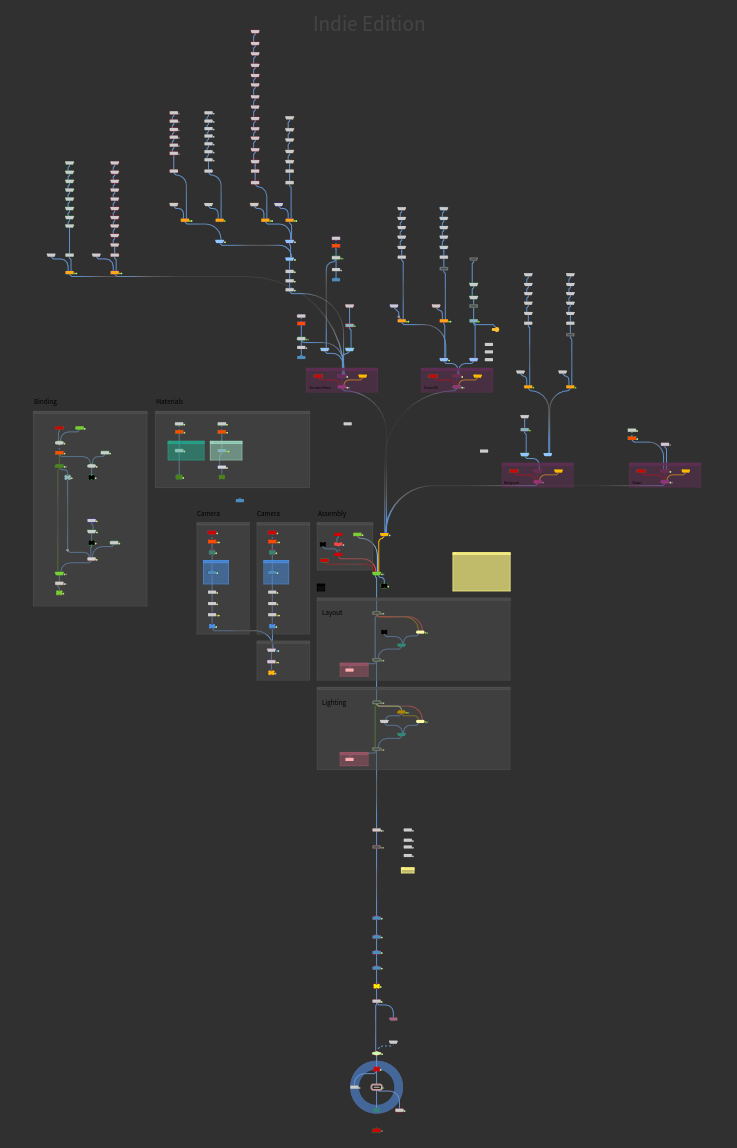
What is USD?
USD (Universal Scene Description) is a powerful open-source framework developed by Pixar for the interchange of 3D data, particularly in animation and film production. It offers several key benefits:
Collaboration Across Teams
USD supports a collaborative workflow by enabling multiple artists or teams to work on the same scene simultaneously. It allows for non-destructive edits and layering, making it easier to handle complex scenes with multiple assets.
Scalability
USD is designed to handle large-scale data, enabling studios to manage highly complex scenes with millions of objects or characters, which is essential in high-end animation and VFX productions.
Interoperability
USD is widely adopted across different software platforms (e.g., Maya, Houdini, and Blender), enabling seamless data exchange between various tools. This cross-platform compatibility reduces the need for data conversion and helps maintain consistency.
Modularity and Reusability
With USD, artists can create assets that are modular and reusable, making it easy to swap elements or make adjustments without affecting the entire scene. This saves time and effort in asset management.
Efficient Pipeline Integration
USD is highly customizable, allowing studios to tailor it to their production pipeline. It integrates well with existing rendering engines and tools, streamlining workflows from pre-production to final rendering.
Rich Metadata and Versioning
USD allows for the embedding of rich metadata (such as texture references, animation states, and lighting setups) within scenes. It also supports version control, making it easier to track changes and revert to previous states if needed.
Real-Time Previews
The real-time capabilities of USD make it possible to preview complex scenes during production, facilitating quicker decision-making and more accurate feedback for artists.
Asset development
The standard tools are fine for basic assets when you’re using Houdini’s internal Karma render engine. The USD graph is made with Houdini in mind. This makes it a little more unreliable when paired with tools outside of Houdini. And when you want to use external render engines such as Redshift some features don’t always translate over. Some important performance optimizations are also missing when creating more complex assets.
What is done right?
- Separate Render and Proxy geometries
- Separate component builder tools for flexibility and scalability
- Separate variance files on top of the main asset to add them to the layout asset gallery
What needs to be changed?
- The draw mode ‘textured cards’ needs to be embedded to the asset so the textures are relative instead of absolute.
- Ability to import Alembic Archives to keep the local xforms (local location)
- Better GeomModelAPI handeling
- Save each model (such as render/proxy variations and overall variants) as a separate file and reference it with payloads for better scalability. By default all models are saved as a single big usdc file.
Proposed Scene graph structure
Custom tools
GG Comp Geometry
Import geometry to be used for the asset, define separate render, proxy and simproxy files. Use the Object scale menu to define the units used in the DCC where the original file was exported from.
Import modes:
- Imported Files: Import generic mesh files such as fbx, obj and abc
- Alembic Archive: Import alembic (abc) archives and keep the local transforms.
- Refrenced Files: Refrence an existing USD file
- Custom Network: Dive inside to edit the custom network for editability after the import, such as instancing.
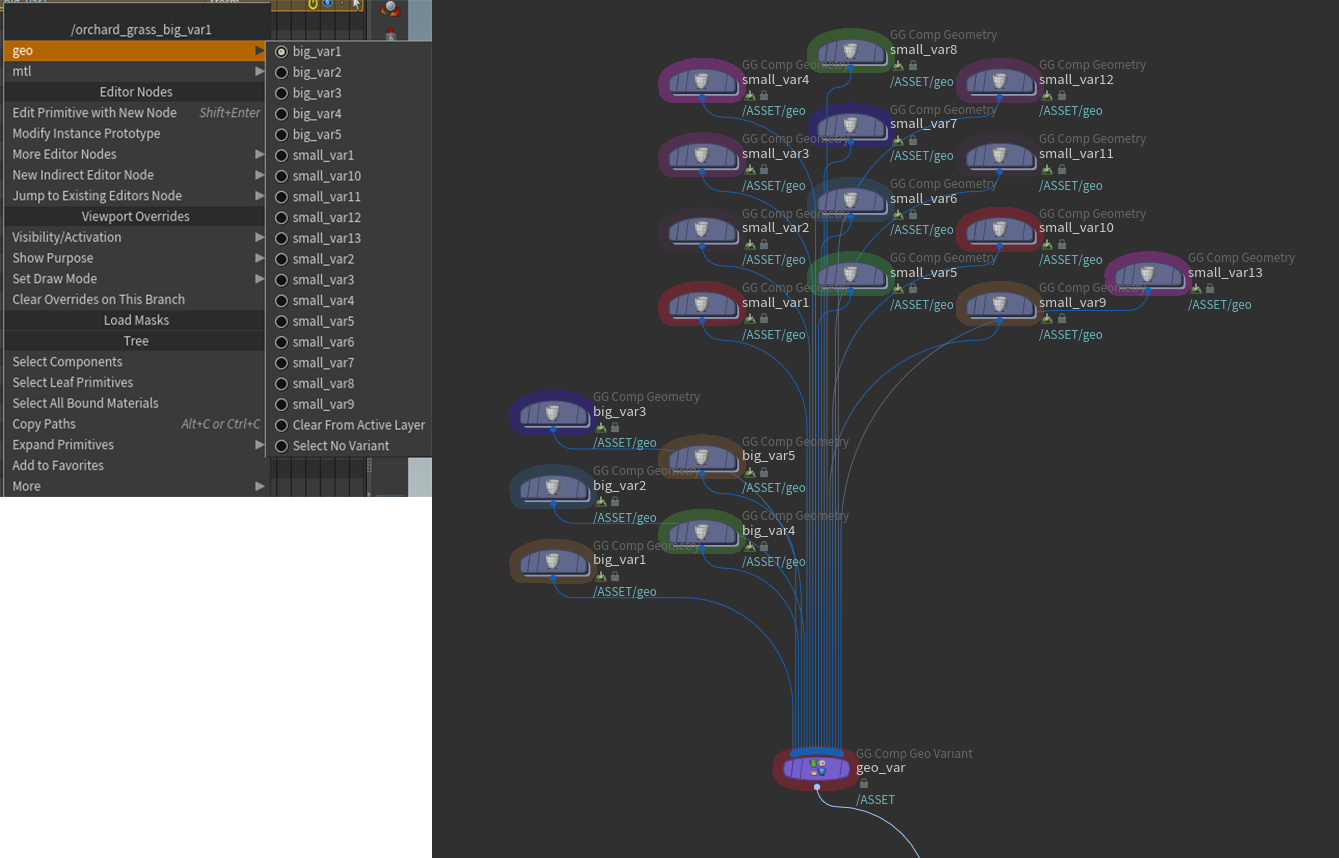
GG Comp Geo Variant
Connect multiple GG Comp Geometries to add geo variants.

GG Comp Material
Add material libraries and bind the materials to prims
GG Comp Output
Set default Variant add variant layers. Write USD files and render variant thumbnails and texture cards using Redshift.

GG Thumbnail Scene
Add a thumbnail scene for lookdef and lighting during the thumbnail and texture card rendering.
Scene Tools
Houdini doesn’t have a clear and propper workflow with USD by default. So I took it upon myself to design some tools that use a propper layering system while also staying flexible enough to adapt it to my own workflow.
GG Scene Layer Base
Add layers to the scene such as CFX, VFX and Animation
GG Scene Layer Shot
Add shot based layers for a existing layer.
GG Scene Layer End
Apply the base and variants and set save locations for said layers.
GG Scene Pre-vis
Add a Pre-vis layer to the scene graph. These will not be exported and should only be used as a reference point.
GG Scene Assembly End
Connect all Assembly layers to this final Assembly layers. This adds save paths and ads it as a sublayer.
GG Scene Assembly Sublayer
Add sublayers to the main Assembly and branch out the main layer.
GG Scene Assembly Camera
Add a shot based camera.
GG Scene Cache
Cache and load layers. This can greatly improve viewport performance and reduce ram.
GG Scene Setup
Add global settings to the scene. Layers can reference these settings. Define your scene name, save path and entry file.
Base Frame-range is the min and max time used in any given shot. This makes sure the final file caches and outputs everything.
Add your scene layers and shot names.
GG Scene Pre-vis
Import a Pre-vis scene as file as an guide for the final scene. This is only loaded in viewport, this will not get saved to disk.
Example renders
Statistics
Using instaning you can easily scatter a bunch of heavy geometry to render a detailed scene.
Redshift reported to have rendered over 78.000.000.000 triangles.
Here is the stage from the final render. Using all of the scene tools
Try it yourself!
Download the tools try them out yourself.
HDA Limited commmercial only
Mark is goat
🐐