Over the last 2 years, I have been experimenting with capturing high-quality facial performances using a 4D photogrammetry rig, also known as volumetric photogrammetry. Unlike traditional photogrammetry, which focuses on creating a single 3D model from a set of photos taken from different angles, 4D photogrammetry captures entire sequences of moving geometry over time using multiple cameras at the same time.
This technique is widely used in visual effects, gaming, and virtual production to create realistic facial animations. Studios such as DI4D, Esper, and Clear Angle Studios use similar techniques for blockbuster films, AAA games, and high-end commercials. The process involves synchronizing multiple cameras around a subject’s face, capturing images simultaneously at high frame rates, and reconstructing a 3D mesh for every single frame. The result is a fully animated 3D sequence that preserves even the smallest facial details, such as wrinkles, muscle tension, and subtle skin deformations.
If you have read my previous blog post on standard photogrammetry, you already know that producing a single high-quality static scan is a challenge on its own. With 4D photogrammetry, the difficulty increases significantly because we are no longer solving just one frame. Instead, we need to reconstruct hundreds or even thousands of frames while keeping everything perfectly aligned across time and across all cameras.
Why Use 4D Photogrammetry for Faces
Traditional facial capture techniques, such as marker-based motion capture, often fail to record the subtle skin movements and micro-expressions that make a performance believable. In contrast, 4D photogrammetry produces a full geometry sequence for every frame, which allows for extremely accurate reconstructions of facial motion.
This is particularly useful for several application:
Visual effects pipelines, where realistic digital doubles are required for film production.
Game development, where detailed FACS-based rigs are used to achieve next-generation facial animation.
Research and machine learning, where large datasets of facial movements are needed for training AI-driven reconstruction systems.
However, achieving this level of accuracy comes with its own set of challenges. The rigs are complex to build, the lighting has to be carefully controlled, and the cameras need to be synchronized perfectly. My goal was to design and build a custom 4D facial capture rig using relatively affordable hardware to see how close I could get to professional results.
Building My First 4D Rig (Rig 1)
For my first rig, I started with a set of GoPro Hero 4 cameras arranged around the subject’s face. The idea was to record video from multiple angles, extract image sequences from each camera, and process them in Agisoft Metashape using its 4D toolset. Once the scans were reconstructed, they would be wrapped onto a predefined base mesh using Faceform Wrap4D, which would give us consistent topology suitable for animation and VFX.
Version 002 - The First Tests
The first attempt used three GoPro cameras mounted side by side. The basic setup worked and I was able to reconstruct a rough mesh sequence from the recordings. However, there were major limitations. The capture area was extremely small, covering mostly the center of the face, and the reconstructed geometry sequence was unstable and noisy. This made the results unusable for any kind of production work.
This first test highlighted two important problems: there were not enough cameras to cover the full face, and the resolution per region of the face was too low to achieve clean tracking and stable geometry.
Version 003 - Rotating the Cameras Vertically
To improve the pixel density on the subject’s face, I rotated the three GoPro cameras into a vertical orientation. By doing this, each camera captured a taller image, which effectively increased the resolution across the face and expanded the usable capture area. While this change did not fully solve the coverage problem, it improved alignment results inside Agisoft Metashape and produced slightly better reconstructions.
Version 004 - Better Lighting & Masking
Lighting plays a huge role in 4D photogrammetry. For this version, I added several cheap LED panels to create a more uniform lighting setup. Shadows were reduced, which made it easier for Metashape to detect consistent features across all cameras. I also began masking the subject in DaVinci Resolve before processing. By isolating the subject from the background, Metashape had access to more usable tie points, which improved camera alignment and overall stability.
This version made it clear that proper lighting and clean masking are essential for achieving good scan quality.
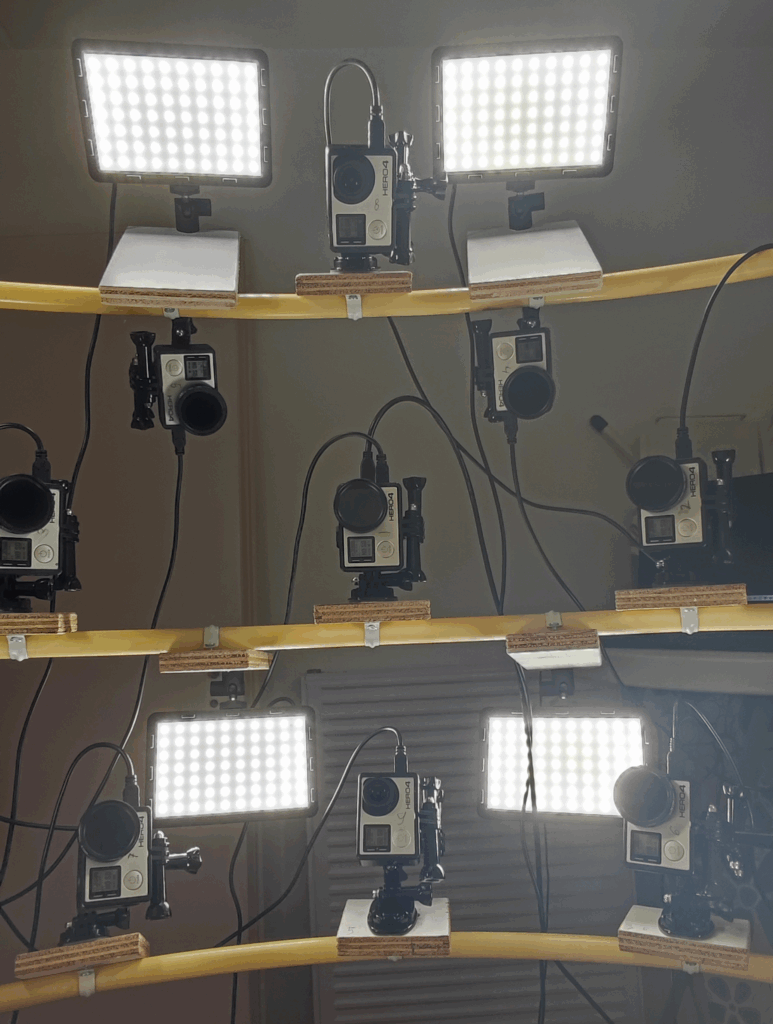
Version 006 - Scaling Up the Rig
In this version, I upgraded the setup from three cameras to seven and arranged them in a circular cage to capture a wider range of angles. I also added more LED panels to make the lighting more uniform and reduce shadows on the subject’s face.
To further improve scan quality, I experimented with adding inexpensive polarizing filters on both the cameras and the LED panels to reduce specular highlights on the skin. However, cross-polarization only works effectively when all light sources are perfectly aligned, and in this setup they were not, so the benefit was limited. Because the cameras were placed further away in order to fit the circular cage, the effective resolution on the subject dropped compared to earlier versions.
This was an important step forward because the total captured area increased significantly, but the trade-off was lower per-camera resolution and less reliable fine detail.
Version 007 & 008 - Refining Camera Placement and Masking
At this stage, I experimented with the camera positions and tested different settings inside Agisoft Metashape. I also made better use of the built-in masking tools to isolate the subject from the background more effectively.
These changes resulted in slightly higher resolution in the reconstructed geometry, but the overall captured area became smaller since the cameras were now focused more tightly on the face. It was a trade-off between coverage and detail, and while this improved the scan quality in certain regions, it also reduced the overall flexibility of the rig.
Version 009 - Expanding to Nine Cameras
In this version, I increased the camera count from seven to nine. By carefully adjusting the layout, I was able to capture a slightly larger portion of the face while maintaining most of the improvements in resolution from the previous tests.
While this did not solve all stability problems, the additional viewpoints provided Metashape with more tie points, which made the alignment slightly more reliable.
Version 011 - Modifying the GoPro Lenses
Up to this point, I was using the stock GoPro Hero 4 lenses, which are very wide and have significant distortion. For version v011, I modified the cameras by replacing the default spherical lenses with custom lenses that produce a much more linear image and a lower field of view.
This change had several benefits. Because the lenses now produced less distortion, Agisoft Metashape could align the images much more reliably, which immediately improved scan quality. The lower field of view also allowed me to place the cameras slightly farther away without losing too much resolution. This increased the overall captured area and gave Metashape better geometric context when reconstructing the face.
This was one of the most important upgrades so far and had a huge impact on stability and image quality.
Version 012 - Testing Tracking Markers
For this version, I introduced tracking markers on the subject’s face to see if they could improve alignment results. While they did not noticeably increase the reconstruction quality in Metashape, they will become important later during Faceform Wrap4D processing. Tracking markers are critical when wrapping meshes to FACS scans and during facial performance solving, so this test was mainly preparation for the later pipeline stages.
Version 013 - Improving Temporal Stability
At this stage, I focused on making the reconstructed geometry sequence more stable over time. In Agisoft Metashape, I switched to the Depth Mapping reconstruction mode and used the Ultra High preset combined with Aggressive Filtering.
This improved the temporal stability of the animation quite a bit and produced higher-quality surface detail, but the trade-off was a slightly reduced capture area compared to earlier tests. Despite this limitation, the results were significantly cleaner and smoother, making this an important step forward.
Version 014 - Finding the Best Balance
After a lot of testing, I settled on new settings in Agisoft Metashape that struck the best balance between quality, stability, and captured area. I used Depth Mapping reconstruction on the High Quality preset with Moderate Filtering.
This configuration preserved more of the total capture area compared to v013 while still producing a stable, high-quality mesh sequence. At this point, I finally had a workflow that was somewhat reliable for small-scale tests.
Summary of Rig 1
Rig 1 was an important proof of concept and taught me a lot about the challenges of building a DIY 4D photogrammetry system. While I was able to achieve usable results in controlled scenarios, there were several limitations that became difficult to overcome with the GoPro-based setup.
The biggest challenge was temporal stability. Even with careful lighting and optimized camera layouts, the GoPro video files still contained a significant amount of image noise. This caused small inconsistencies in tie point detection between frames, which made the animated geometry jitter more than desired.
Another major limitation was synchronization. The GoPros could not be perfectly synced across all cameras, which meant that each frame was always slightly misaligned, even after manually correcting timestamps. For facial performance capture, where precision is critical, this became a significant problem.
Finally, the shutter speed of the GoPros was too low. With quick facial movements, motion blur became a serious issue, which caused a noticeable drop in scan quality whenever the subject moved rapidly.
These lessons ultimately led to the design of Rig 2, which uses a completely different approach based on DSLR cameras rather than action cameras. The goal with the second rig was to improve resolution, synchronization, and stability while laying the foundation for a better integration with Faceform Wrap4D.
Rig 2 - Moving to a DSLR-Based Capture System
After pushing Rig 1 as far as it could go, it became clear that the GoPro-based setup had reached its limits. The biggest issues were synchronization, motion blur, and sensor noise, all of which severely affected reconstruction quality. To overcome these problems, I started designing a second rig using DSLR cameras and a different capture workflow inspired by Faceform’s 4DHMC pipeline.
Unlike Rig 1, which relied on video capture, Rig 2 is built around photo-based sequences. Instead of extracting frames from videos, each camera captures individual high-resolution images simultaneously. This produces far cleaner data with less compression noise and almost no motion blur, which makes the scans much easier to align and reconstruct.
Another major change was the use of FACS scans. FACS stands for Facial Action Coding System and refers to a structured library of facial expressions designed to capture the full range of motion in the human face. These FACS scans later become critical for high-quality facial performance processing in Faceform Wrap4D.
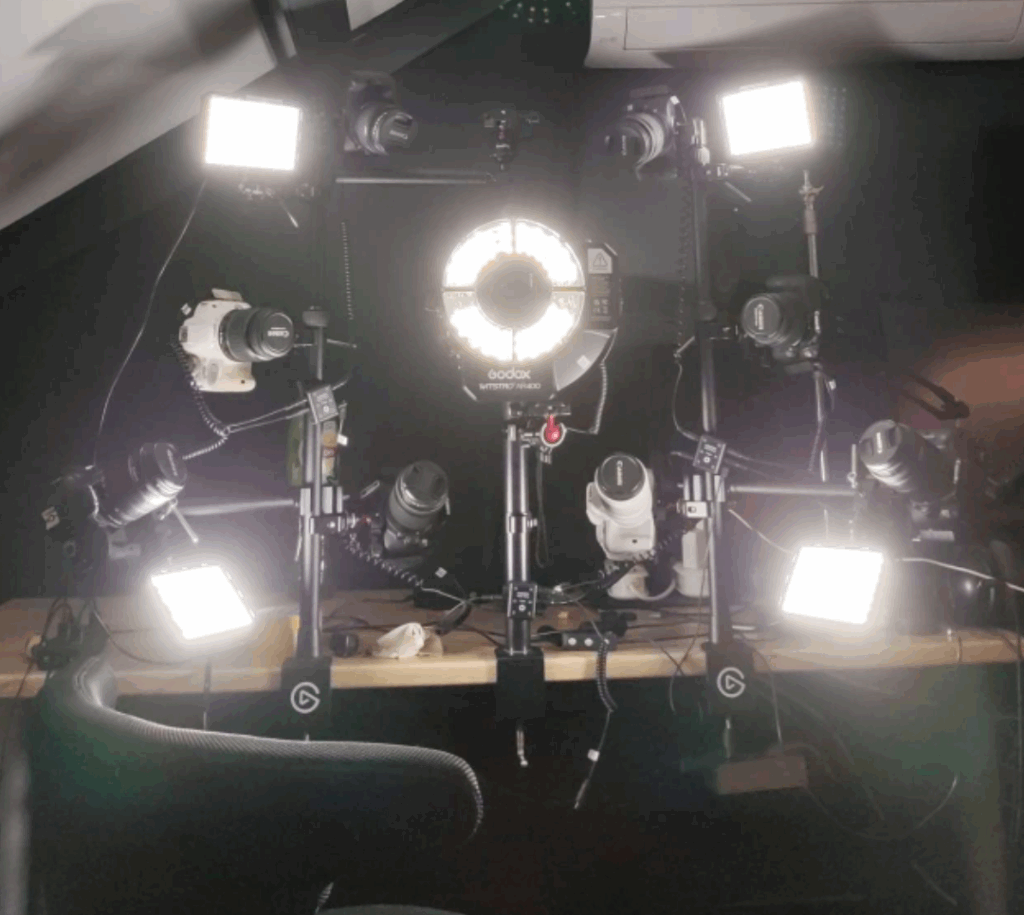
The cameras are mounted in a honeycomb pattern to maximize angular coverage while staying close to the subject. To ensure perfect synchronization, all cameras are connected via their trigger ports to a Fanotec Nodal Ninja controller, allowing me to fire every shutter at exactly the same time.
Version 016 - The First DSLR Tests
The first version of Rig 2 used five Canon EOS 100D cameras. Even with only five cameras, the scan quality was already significantly higher than anything produced with Rig 1. The larger sensors, higher-resolution still images, and reduced image noise made a noticeable difference.
However, the alignment inside Agisoft Metashape was still inconsistent. With only five viewpoints, there were not enough overlapping angles for reliable tie point detection, which sometimes resulted in reconstruction artifacts.
This first test confirmed that switching to DSLR cameras was the right direction, but it also showed that more cameras and better lighting would be necessary to get consistent results.
Version 020 - Adding More Cameras and Proper Flash Lighting
For this version, I increased the total camera count to nine Canon EOS 100Ds and added a Godox AR400 ring flash fitted with a polarizing filter. The flash allowed for much brighter, sharper exposures with minimal motion blur, and the use of polarization helped reduce skin reflections.
In combination with the extra cameras, this setup gave a dramatic improvement in reconstruction quality. Shadows were reduced, fine details were preserved, and the geometry became more consistent across frames.
This was the point where the new rig began producing results that were clearly ahead of the GoPro setup.
Version 021 - Testing Facial Poses
With a stable nine-camera setup, I began capturing more varied facial expressions to evaluate coverage gaps. While most areas of the face reconstructed well, I noticed that certain regions lacked enough resolution and clarity, particularly under the chin and along the jawline near the ears.
This highlighted the need for additional camera angles to cover the underside of the face and to better capture profiles.
Version 023 - Expanding to Eleven Cameras
To address the coverage gaps, I increased the camera count to eleven Canon EOS 100Ds. The additional cameras filled in missing viewpoints around the jawline and chin, which improved alignment and reduced reconstruction errors.
With eleven synchronized high-resolution cameras and proper flash lighting, the scan quality improved significantly. The geometry became more complete and the texture capture was more consistent across the entire face.
Version 024 - Capturing a Complete FACS Library
By this stage, I was finally satisfied with the resolution, coverage, and stability of the DSLR rig. With this configuration, I captured a full set of FACS scans for use in the later Faceform Wrap4D pipeline.
These scans represent the entire range of core facial expressions, such as smiling, frowning, raising eyebrows, tightening eyelids, and many others. By capturing this structured dataset, I can later guide the deformation of a base mesh during facial performance solving, ensuring high-quality, consistent results.
Summary of Rig 2
Rig 2 marked a significant leap forward in both hardware and workflow design. By switching to DSLR cameras, the quality of individual frames improved dramatically thanks to larger sensors, higher-resolution images, and better optics. The addition of synchronized flash lighting and cross-polarization reduced motion blur and improved surface detail, while the use of a trigger controller ensured perfect camera synchronization.
Compared to Rig 1, Rig 2 achieved:
Higher-resolution images with much lower noise
Perfectly synchronized shutters using hardware triggers
Better lighting quality through high-intensity flash and polarization
Expanded camera coverage with up to eleven viewpoints
A complete library of FACS scans for downstream animation workflows
This rig finally provided the stable, high-quality data necessary for integrating with Faceform Wrap4D, which is where the processing pipeline truly begins.
Preparing the Faceform Wrap4D Workflow
With the FACS scans captured from Rig 2, the next step was to process them inside Faceform Wrap4D. This software is specifically designed for high-end facial reconstruction and performance solving. The main goal here was to create a clean, consistent base mesh and then use it to wrap all the FACS scans. By keeping the topology uniform across every expression, we make the data suitable for animation, VFX, and later integration into facial rigs.
The workflow is fully node-based, which allows for a highly standardized process that can be reused across multiple actors and datasets.
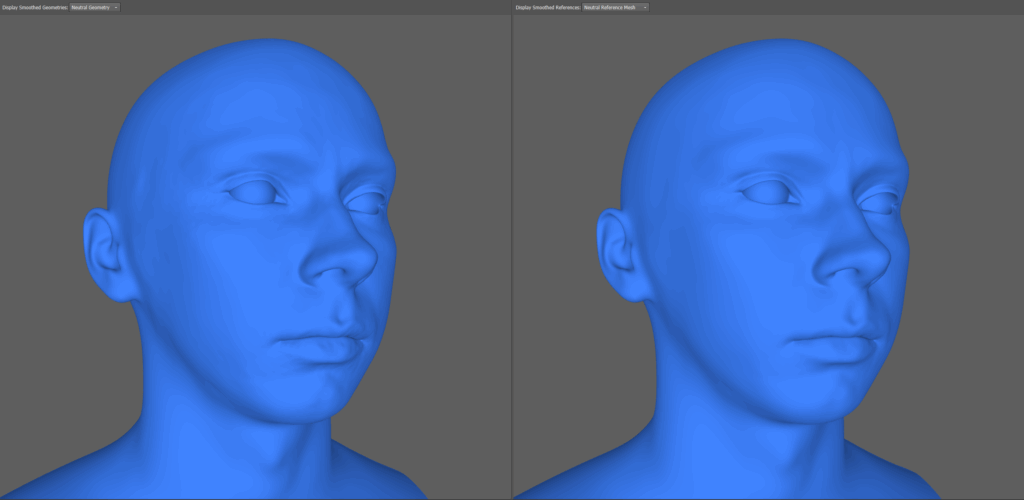
Step 1 - Wrapping a Base Mesh on a Neutral Scan
The first step was to prepare a neutral scan of the subject, which represents their relaxed, expressionless face. This scan becomes the foundation of the entire pipeline.
Inside Wrap4D, I imported the neutral scan and wrapped a predefined clean base mesh onto it. Since the scans captured by the rig are not full 360-degree captures, some regions, such as the back of the head and parts of the neck, often required manual cleanup. Wrap4D includes integrated sculpting tools, which made it possible to correct problem areas directly on the wrapped mesh without leaving the software.
Once completed, this gave us a perfectly wrapped neutral base mesh that would serve as the reference for all other scans.
Step 2 - Wrapping the FACS Scans
With the neutral base mesh prepared, the next step was to wrap all the FACS scans. Since each expression in the dataset needs to share identical topology, the base mesh was reused and deformed to match each FACS scan individually.
To make this process efficient, I designed a standardized wrapping workflow inside Wrap4D. Each scan follows the same sequence of nodes to ensure consistent quality and predictable results.
The workflow looks like this:
Scan Alignment
Each scan is manually aligned with the base mesh to ensure correct orientation and scale.Point Pair Setup
Point pairs are selected between the base mesh and the scan. These serve as guides for the wrapping algorithm and improve accuracy, especially in areas like the eyelids, nose, and mouth.Initial Wrapping Pass
The scan is wrapped for the first time using the selected point pairs.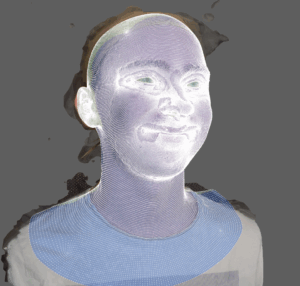
Brush Corrections
After the first wrap, I use a brush node to smooth problem areas, fix overlaps, and manually improve surface continuity.Fix Intersections and Subdivide
A Fix Intersections node cleans up overlapping geometry. The mesh is then subdivided to increase resolution, preparing it for finer adjustments.Second Wrapping Pass
With the higher-resolution mesh, the scan is wrapped again. This captures finer surface details more accurately.Final Brush Pass
A second brush node smooths any residual noise and corrects remaining problem areas.Blending the Base Mesh
In regions that should remain static, such as the shoulders and back of the head, I blend in the original neutral base mesh. This ensures clean and consistent geometry transitions between expressions.Texture Transfer
Finally, the high-resolution scan textures are transferred onto the wrapped mesh for reference and for use in later stages of performance solving.
For every scan, I export two versions of the wrapped mesh:
L1 → The unsubdivided version, which is lighter and faster to process.
L2 → The subdivided high-resolution version, used later to capture fine facial details.
By standardizing this process, I was able to prepare an entire library of FACS scans much faster while maintaining consistent quality across all assets.
Processing Facial Performances in Faceform Wrap4D
Once the FACS scans and base mesh are prepared, the next step is to process actual recorded facial performances. Ideally, this would involve using a head-mounted camera rig (HMC) with synchronized stereo cameras, but since I did not have access to an HMC, I set up two GoPros vertically on a desk clamp to simulate a dual-camera configuration. While this method requires the actor to keep their head perfectly still, it works well for testing the pipeline.
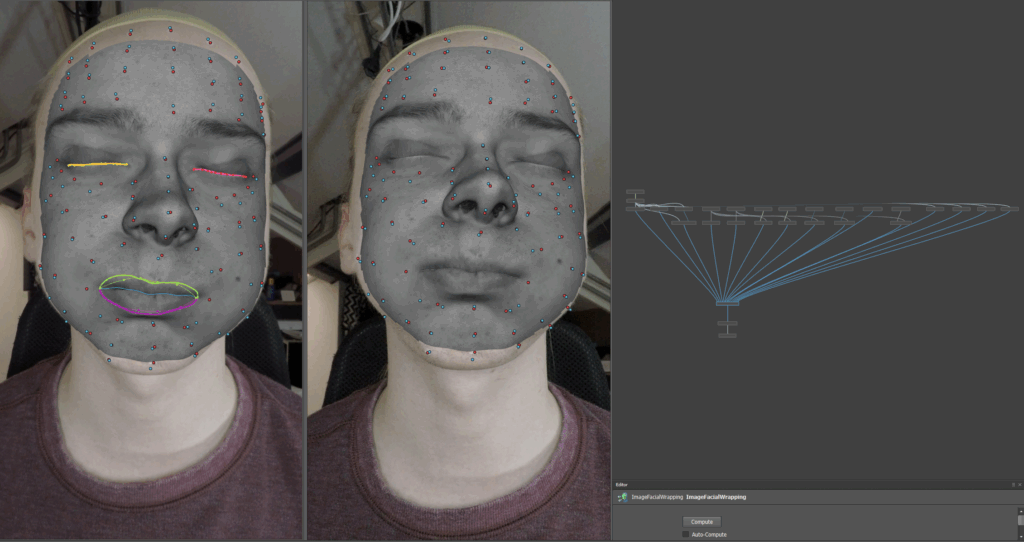
Step 1 - Labeling Markers
The facial tracking markers placed on the subject are labeled inside Wrap4D. These labels are used later during performance solving to identify key points on the face.
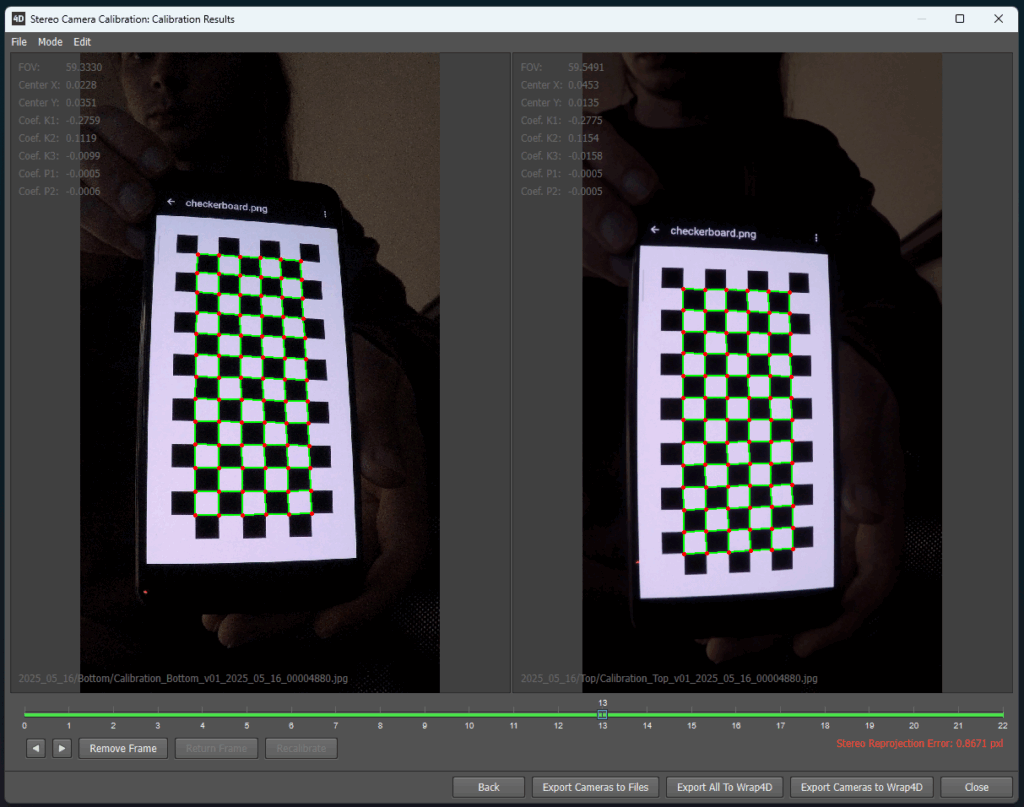
Step 2 - Stereo Camera Calibration
Before processing, the stereo cameras must be calibrated. Using a standard checkerboard pattern, Wrap4D determines the exact position and optical parameters of each camera, ensuring that the 3D reconstruction aligns perfectly with the recorded footage.
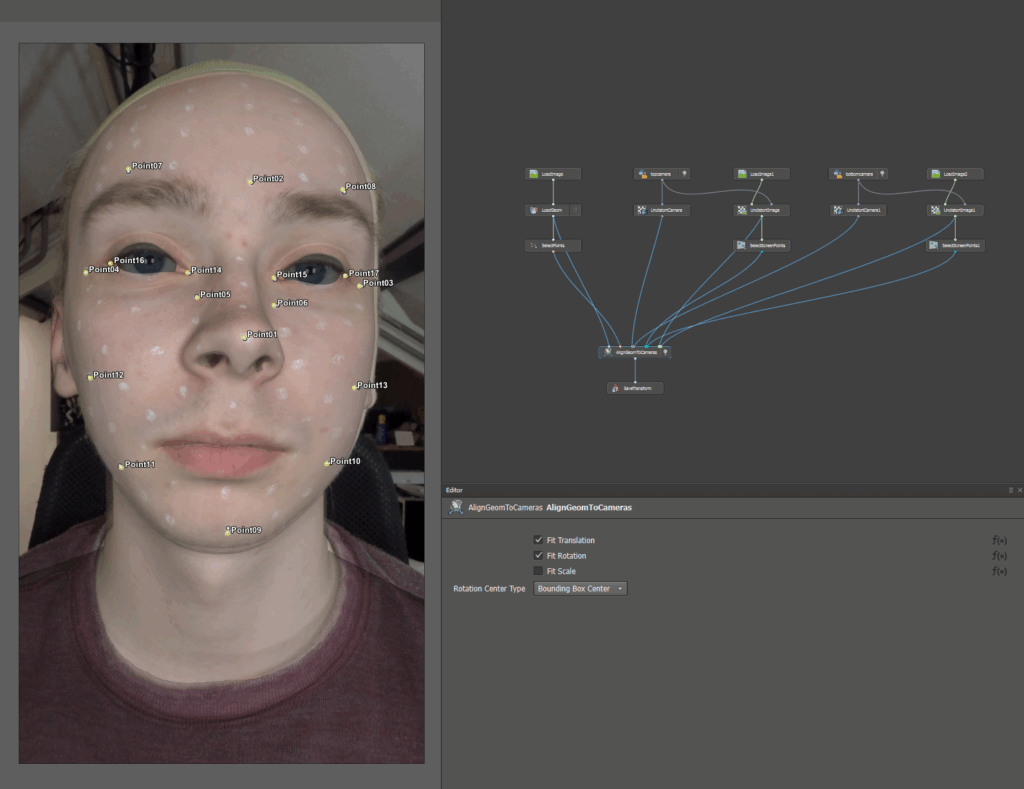
Step 3 - Face-to-HMC Alignment
The captured facial footage is aligned with the stereo cameras, establishing the correct coordinate space for tracking and mesh reconstruction.
Step 4 - Tracking the Markers
The labeled facial markers are tracked frame by frame in both camera views using Faceform Track. This provides accurate tracking data for the main facial regions and guides the subsequent reconstruction steps.
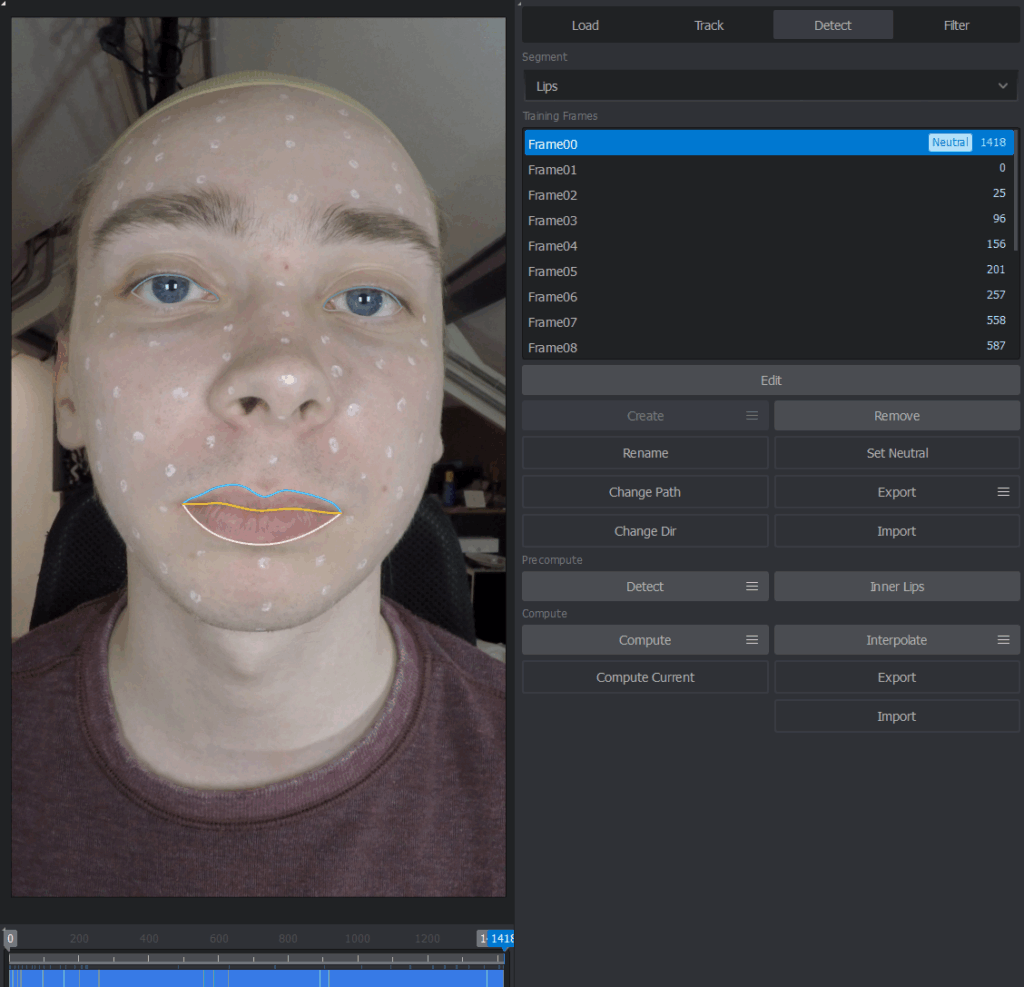
Step 5 - Lip and Eyelid Contour Detection
Since tracking markers cannot cover the edges of the lips and eyelids, Faceform includes dedicated tools for automatic contour detection. This ensures accurate motion capture in these sensitive regions.
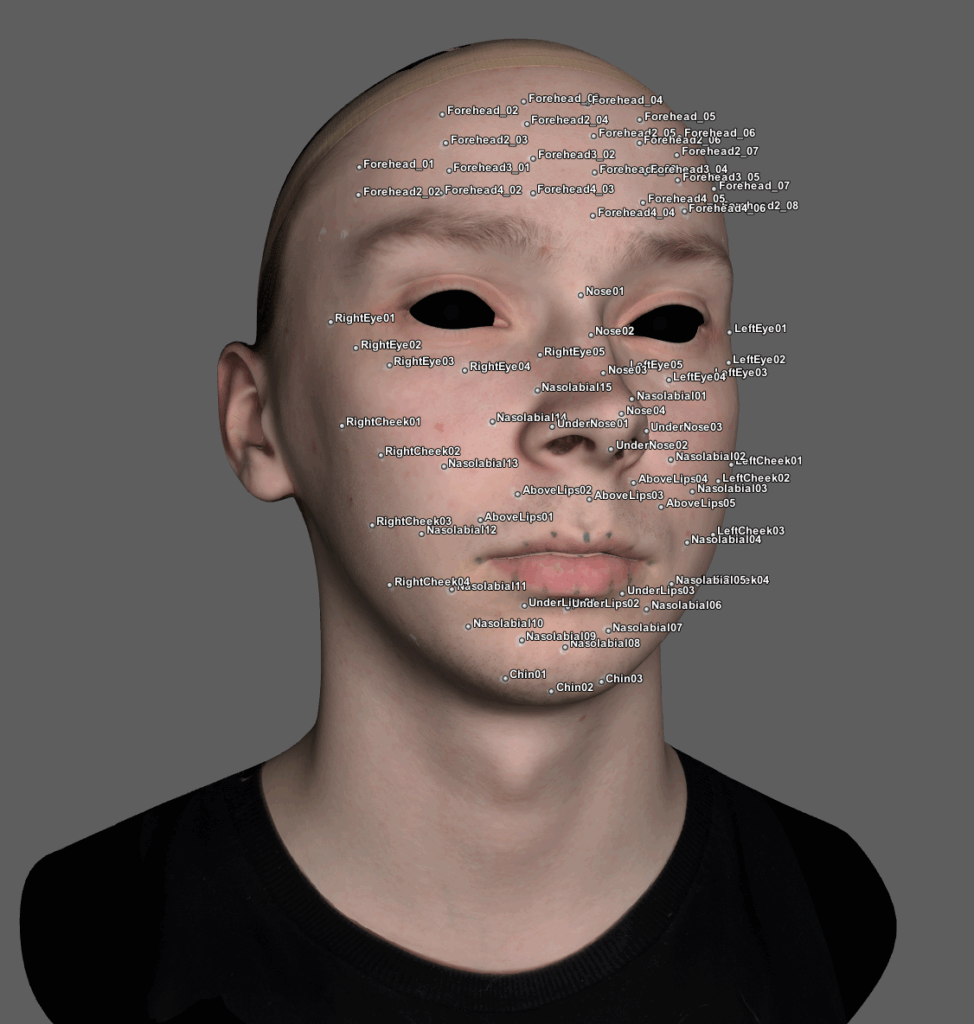
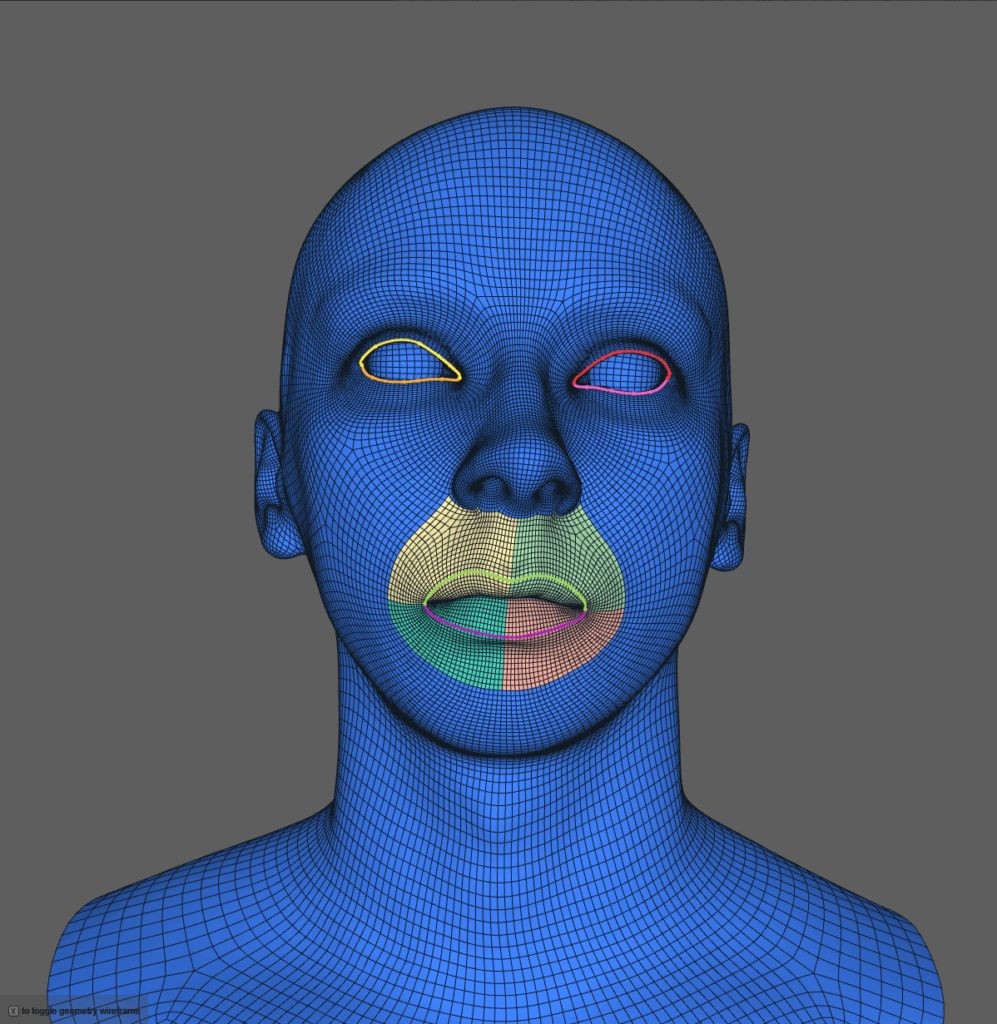
Step 6 - Facial Annotation
Facial annotations are created for the neutral base mesh. These define key facial features, such as eyelid edges, lip outlines, and specific muscle zones. This step is essential for guiding later stages of facial solving.
Step 7 - Image-Based Facial Wrapping
All previously gathered data is combined into a single project. The stereo images, marker tracking, and annotations are used to drive a deformation of the base mesh for every frame in the recording. This produces the first animated mesh sequence.
Step 8 - Guidable Head Stabilization
If the actor moves their head during the recording, Wrap4D attempts to stabilize the mesh sequence by tracking and compensating for head motion. This keeps the facial performance aligned in 3D space.
Step 9 - Guidable Replace
Since the GoPro-based recording setup only used two cameras, there are regions of the head that are not always visible. The Guidable Replace tool uses the pre-captured FACS scans to reconstruct hidden geometry and fill in missing details.
Step 10 -Guidable Delta Mush
The mesh sequence is upscaled using the high-resolution L2 meshes. This step injects fine surface details, such as skin wrinkles and subtle folds, back into the animated sequence.
Step 11 to 14 - Eye Processing and Geometry Cleanup
Project Eye Textures: An eye base mesh is added, and the actor’s recorded eyes are projected onto it for future tracking.
Fit Eye Direction: The actor’s gaze direction is tracked and fitted to the eye geometry.
Eye Interpolation: Missing frames caused by blinks or occlusion are filled using interpolation for smooth motion.
Fix Intersections: Final cleanup is performed to ensure the eyelids and eyes do not intersect unnaturally.
Step 15 - Temporal Smoothing
Because the GoPro recordings introduce a lot of image noise, the reconstructed meshes tended to jitter frame to frame. To reduce this, I applied temporal smoothing inside Wrap4D, which improved playback stability.
Final Sequence
Current Limitations and Future Improvements
While the current pipeline produces usable results, there is significant room for improvement:
Adding more cameras to the photogrammetry rig would increase the total scan area and reduce the amount of manual correction required.
Upgrading to higher-end recording cameras would reduce noise and improve per-frame quality.
Adding more synchronized flash lighting would minimize shadows and improve texture consistency.
Building a proper head-mounted camera rig would allow actors to move naturally, enabling simultaneous body motion capture and facial performance recording.
The Uncanny Valley Problem
The current results are still deep within the uncanny valley. This happens when a digital human looks realistic in some ways but lacks certain subtle details, making it feel unnatural or unsettling. Improving temporal stability, increasing scan resolution, and refining the Wrap4D pipeline are all essential steps toward closing this gap.
Opportunities
Despite these challenges, the captured FACS scans already have significant value. Because the topology is consistent and the shapes are standardized, these assets can be integrated into facial rigs for games, virtual production, and high-end VFX work. With further refinement, this pipeline can produce production-ready performance capture data.